Recipe #1: DukeWorthy™ Seattle Double Sourdough: A Duke’s Tradition
Duke’s at Home Recipe Series:
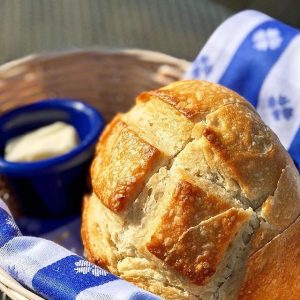
My love of San Francisco and its famous sourdough bread is why every meal at Duke’s begins with a basket of this delicious, warm delight, served with fresh Darigold butter. It’s also why we own our exclusive Double Sourdough recipe, developed just for Duke’s.
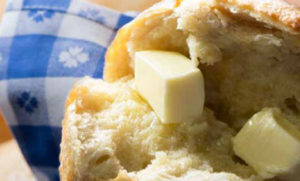
Sourdough bread is a true flavor experience. Soft, airy, perfectly sour inside and with a crispy brown crust, blistered by the heat of a hot oven.
This delicious slice of heaven has been in our restaurants since I opened the first Duke’s Chowder House in Seattle in 1977. The search for the perfect sourdough bakery took years. At one point I was having sourdough flown from a bakery in San Francisco! Finally, we teamed up with The Essential Bakery Company, one of the few large-scale bakeries remaining in Seattle that produces “true” sourdough bread. And now, you can make this special treat at home. I’ll show you how.
First, a warning: Many operations these days use “sourdough flavoring” in their bread instead of allowing the starter to ferment over a period of days as tradition demands. Not this recipe, or at Duke’s. Sometimes great flavor takes time. This one is worth the wait.
If you already have an active and healthy sourdough starter, feel free to use it here. Otherwise, you’ll need to get a starter going. It’s not hard, but it will take about a week before you can get baking.
Double Sourdough Bread
Day 1: Mix 1 cup of flour and 1¼ cups of cool water in a medium-sized bowl. Mix the two ingredients just until they come together. Cover with a towel or plastic wrap and let stand at room temperature.
Day 2: Remove 1 cup of the starter and discard it. (It seems odd, but it needs to be made with the larger amounts, though in the end, only about ½ is needed.) Add ½ cup cool water and ½ cup flour to the remaining starter and mix just until it comes together. Repeat this process for days 3, 4, 5 and 6. Your starter should become more bubbly and alive day by day.
On the seventh day, it will be ready to use.
If you want to keep your starter going: On Day 7, remove a cup of the starter, but instead of throwing it out, keep it. This will be the starter you’ll use in your bread.
If you’re not going to bake with it, discard it as usual and follow the directions from Day 2. Cover and let your starter stand at room temperature for 3 hours. Now you can put it into the refrigerator. You’ll still need to feed it about once a month (minimum), using the instructions from Day 2 to keep it alive. When it’s time to feed your starter, remove it from the refrigerator and let it stand at room temperature for about 2 hours. Then follow the directions from Day 2.
Now, let’s get baking:
Ingredients
- 6 cups bread flour
- 3 cups lukewarm water
- 1 tablespoon salt
- ½ teaspoon rapid rise yeast
- 1 cup of sourdough starter
Directions
If you are mixing by hand:
- Combine all the ingredients in a large bowl just until it all comes together.
- Turn it out on the table and knead for about 12 minutes.
If you are mixing in a mixer:
- Combine all the ingredients in the bowl of the mixer, fitted with the dough hook, and mix about 4 minutes on slow, then 6 minutes on fast.
- Cover and let rest for 30 minutes.
Let the dough rise at room temp about 2 hours or until you can leave an indentation with your finger. The dough should rise until 1½ times its original volume.
Divide the dough in half. Gently press the gas out of each piece, and shape each piece into a ball.
Pre-heat the oven to 450º. If you have a baking stone, preheat the stone along with the oven.
With a spritzer, spray the inside of the oven every minute or so for the first 10 minutes.
Bake the loaves for 35-40 minutes or until they are golden brown.
Enjoy warm with a lovely hunk of fresh butter.
For more recipes, go to Duke’s at Home Recipe Series in the Duke’s Blog section of the website. (Click Here)